FAQs & Trouble Shootings
(Last update: 14-May-2016)
1, Your domain system should include at least one Domain Controller and one shared host that has joined the domain system. (DC uses static IP address –> install Active Directory Service from the DC’s Server Manager console –> create the domain –> shared hosts join the domain and point DNS to the DC’s IP address.)
2, Install the vMatrix Server Manager on the shared host(s).
3, Create users on the Domain Controller.
4, Add the domain users to the Remote Desktop Users Group on the shared hosts.
5, Log into the host with vCloudPoint zero clients. Hosts will automatically be recognized if they have joined the domain. The picture below shows two login options: the first domain name “CLOUDPOINT” is chosen for domain login; the second one “Local Account” is for local account login. If users choose local account login, they are logging on the host rather than the domain.
6, Select a domain, and then enter your username and password.
IMPORTANT NOTE:
1, You cannot log in an domain administrator account from a zero client. This will cause unavailability of the whole vMatrix and zero client system. If you mistakenly do this, remove administrators from vMatirxServerRemoteUsers group on the shared hosts through Computer Management –> Local users & groups –> groups –> vMatirxServerRemoteUsers group
2, Domain NTLM is not supported at the moment
Note:
1. By default, only users in the Administrator Group can log into the remote Domain Controller, users in the Remote Desktop User Group cannot.
2. If you are using a vMatrix version of 1.6.0.4 or earlier, you have to install the vMatrix both on the Domain Controller and Hosts. If you do not want to install vMatrix on Domain Controller, please use vMatrix version 1.6.0.5 or later.

(Last update: 09-Sep-2016)
By factory default, vCloudPoint zero clients and vMatrix Server Manager software are configured to be used in an internet connected environment (WAN). If your host is provided with the internet, no additional configuration is required to be done. The Operation Mode displayed on the vMatrix User Management page of any device connecting to the host will automatically change from “Offline” in red to “Online” in black, meaning the device is properly working in an internet provided environment.


However, if the Operation Mode of the devices connecting to the host stays “Offline” in red all the time, you have to re-configure the devices for offline usage, otherwise, the devices may be disconnected every few minutes during operation. Use cases where you may encounter this problem and need to apply for “Offline Usage” normally includes the followings:
- you do not provide internet connection (WAN) to the host or the internet connection is extremely unreliable;
- you use proxy or VPN or internet control software that the host cannot access our configuration server.
How to re-configure the devices for offline usage:
1) In a non-internet connection environment, vMatrix Server Manager will prompt a message window for offline usage configuration within 5 minutes after the host boot.

2) Open vMatrix Server Manager, go to Offline Usage page (this page only appears when the host is not provided with internet connection on system boot).
3) Export the configuration profile. Before exporting, please connect to the host all client devices for offline usage, so that the serial numbers (SNs) will be collected in the file. Alternatively, you can write down the SNs if you cannot connect all the client devices (especially in large deployments). The host profile contains hardware information of the host. Therefore, make sure the host hardware, e.g., CPU, memory, drives and network card, are exactly the same as your real offline usage condition, otherwise, if there is any change to the host hardware, the final generated offline configuration will be invalid to the host.
4) The dealer will return you with a configuration file based on your last exported profile. Import the returned file to complete.
5) If your configuration for offline usage is successfully accomplished, the Operation Mode changes from “Offline” in red to “Offline” in black.
Note: Offline usage configuration on vMatrix Server Manager was introduced in vMatirx Server Manager 2.0.2 version, if you are planning to use the vCloudPoint zero clients in a non-internet or unstable internet environment, please use 2.0.2 or a later version of vMatrix Server Manager, and contact the dealer for generating an offline configuration file.
(Last update: 11-Mar-2016)
In Windows 10, 8.1, 8, 7 Operating Systems, all drivers and programs must be digitally signed (verified) in order to be installed. If you do not have an internet connection for your first time of vMatrix Server software installation, you have to disable Windows Driver Signature Enforcement. Otherwise, the USB and audio drivers cannot be executed due to the failure of getting signature verification.
Please follow these steps to disable Driver Signature Enforcement in Windows 10, Windows 8.1, Windows 8, Windows 7, Windows Server 2008 R2 once.
Step 1. Go to Advanced Options menu.
To go to Advanced Options menu in Windows 8 & 8.1 OS:
1. Press “Windows” + “R” keys to load the Run dialog box.
2. Type “shutdown /r /o” and press Enter.

3. Windows informs you that you are about to be signed off. Press “Close”.

4. When Windows restarts, press “Troubleshoot” .

5. In the “Troubleshoot options” screen, choose “Advanced options”.

6. In the “Advanced Options” window, choose “Startup Settings”.

7. In “Startup Settings” screen, click “Restart”.

8. After restart in “Startup Settings” windows, press the “F7” (or the “7”) key on your keyboard to “Disable driver signature enforcement”.

Your computer will restart again.
9. After the restart, proceed to install your unsigned driver. During the installation procedure, Windows will inform you that can’t verify the publisher of this driver software. At this point, ignore the warning message and choose “Install this driver software anyway” to complete the installation.

(Last update: 25th-Mar-2020)
For remote connection with vCloudPoint zero clients over WAN, setting DMZ host is the easiest way but unsafe, therefore, you can add these ports in your router instead.
Enable the vCloudPoint zero clients to access a single host over WAN:
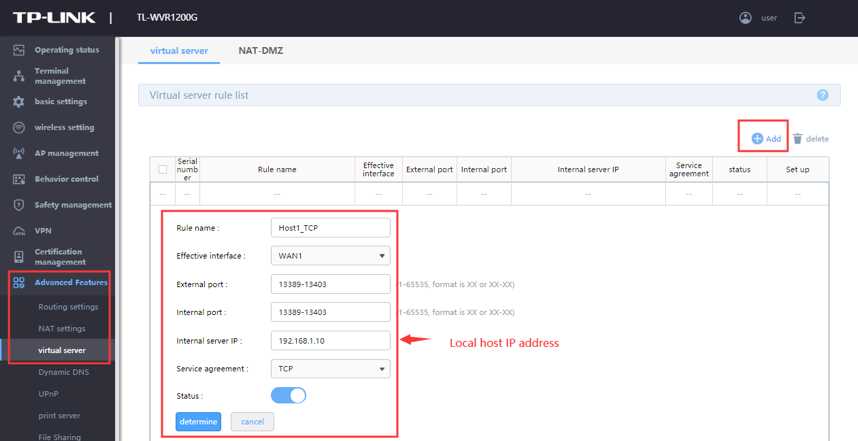
1. Set port forwarding rules on the router. By default, the listening port uses TCP13389-13393, and each end user uses one port, and the remote desktop service port is 3389.

The following example is given on 10 users (always reserve more ports if possible). Settings may vary among routers. The following steps demonstrate the settings on a TP-WVR1200G router.

2. On the vCloudPoint zero clients login interface, manually add the public IP and corresponding port of the host to be logged in, for example, 219.146.73:13389.

Enable the vCloudPoint zero clients to access multiple hosts over WAN:
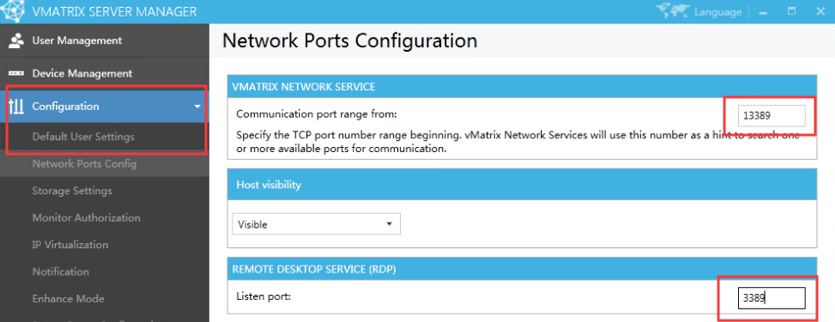
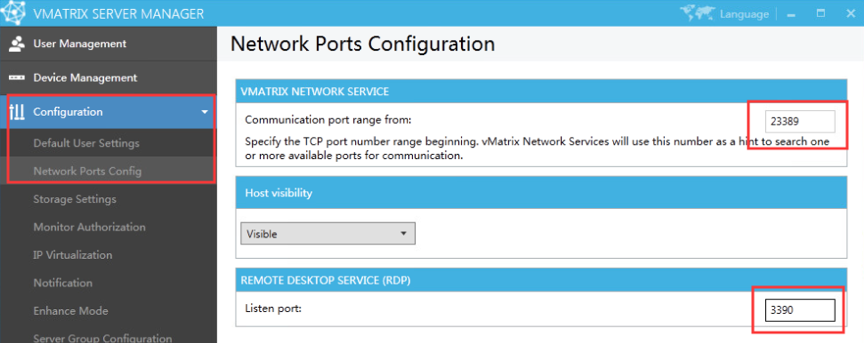
1. Open vMatrix → Configuration → Network Port Config, set the vMatrix Network Service ports, and the Remote Desktop Service ports of each host to be different and make sure that the ports are not occupied.
For example:
Host A, network port 13389, RDP port 3389, local IP: 192.168.1.10.
Host B, network port 23389, RDP port 3390, local IP: 192.168.1.20.
2. Set port forwarding rules on the router. By default, the listening port uses TCP13389-13393, and each end user uses one port. The following example is given on 10 users (always reserve more ports if possible). Settings may vary among routers. The following steps demonstrate the settings on a TP-WVR1200G router.

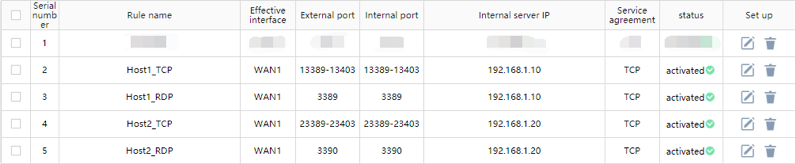
3. On the vCloudPoint zero clients login interface, manually add the public IP and corresponding port of the host to be logged in, for example, 219.146.73:13389 and 219.146.73:23389.


Note: Due to the limited bandwidth and high latency of WAN, the desktop performance may be significantly compromised. Please make sure the internet connection on both ends is well provisioned for delivering desirable desktop performance. It is recommended to provide a dedicated VPN network or configure a broadband network with an uplink speed of at least 10-20mpbs/user (depending on the user’s specific workload) for the host.
(last update: Jul-26-2016)
Note: The wireless option of vCloudPoint S100 and V1 zero clients is designed for occasional use only. Due to the unreliable and high latency of most wireless network, user experience may significantly compromised (frequent laggings or unplanned disconnections). Customers are strongly recommended to use vCloudPoint zero clients with wired connection. For occasional cases or a few typical workplaces where a reliable cable connection is not provided, please test your wireless environment before actual deployment.
If you purchased a non-WIFI model of vCloudPoint zero clients, but later you want to work in the wireless environment, you can turn the zero client into a WIFi supported one by simply attaching a compatible external USB antenna to the vCloudPoint zero client. There are two ways for you to get the external USB antenna.
1, You can purchase the external USB antenna from your local vCloudPoint dealer.

2, Any antenna that is built with RTL8188EUS chip and connects with USB 2.0 standard is supported by vCloudPoint zero clients.
Given blow is the specification of the external USB antenna:
| Connection | USB2.0 |
| Chip | RTL8188EUS |
| Antenna | External 5dBi antenna |
| Antenna standard | IEEE 802.11g |
| IEEE 802.11b | |
| IEEE 802.11n | |
| Speed | 11b:1/2/5.5/11 Mbps |
| 11g:6/9/12/18/24/36/48/54 Mbps | |
| 11n: up to 150 Mbps | |
| Distance | up to 200 meters indoor |
| Frequency range | 2.4~2.4835GHZ |
| Working channel | 1~14 |
| Security features | WPA-PSK/WPA2-PSK |
| WPA/WPA2 | |
| 64/128/152bit WEP encryption | |
| Power | 2.5W |
Steps to configure external WIFI:
1, attach the USB antenna to the zero client;
2, reboot the zero client;
3, go to the “Network” page and you will see the WIFI option coming. See pictures below.
(the WIFI option will automatically display on Network page once the WIFI module is detected on device boot.)
(the first picture shows the “Network” page without WIFI option, and the second one shows that with WIFI option.)


(last update: Aug-09-2016)
By default, theme and wallpaper customization is disabled for terminal users through remote desktop connections. Administrators can enable this option for terminal users through a few simple steps. But enabling this option will increase large resources consumption on the host.
Here are steps to enable theme and wallpaper customization on Windows:
1) for hosts running Windows Client Systems like XP, 7, 8, 8.1, 10 (Desktop Experience features of client systems are pre-installed on system installation).
Open vMatrix Server Manager, on the initial User Management page, right click on the user module and then select “Property” to enter the user’s personal settings. (If you are configuring for all users at a time, go to “Configurations” -> “Default User Settings”.)

Click on “Advanced” tag and then select “optimum” to enable all desktop experience options including wallpapers, themes, menu animations, and window content on dragging. To only enable a single desktop experience option like wallpapers or themes, you can click on a “custom” button for further customization.

Scroll down to “Desktop Options”, select the options which you like to enable, and apply.

The change will take effect on the user’s next login.
2) for hosts running Windows Server Systems like Server 2008R2, 2012, 2012R2, 2016 and Multipoint Server 2011, 2012 (Desktop Experience features for server systems are not installed on system installation).
For server systems, you have to install the Desktop Experience features before configuring at vMatrix Server Manager.
Open Windows Server Manager;

Click “Add roles and features”;

Search for Features –> Desktop Experience;

Confirm to install Desktop Experience features;

When completed, restart the system and then open vMatrix Server Manager to enable the Desktop Experience options as the same to configure for Windows Client Systems mentioned above.
Issue:After installing the recent Windows system patch, shared hosts with RDP Wrapper does not support multiple user log-in. The system prompts a warning that the remote desktop user will log the previous user out. When running “RDPConf” file of RDP Wrapper, it shows “NOT SUPPORTED”.
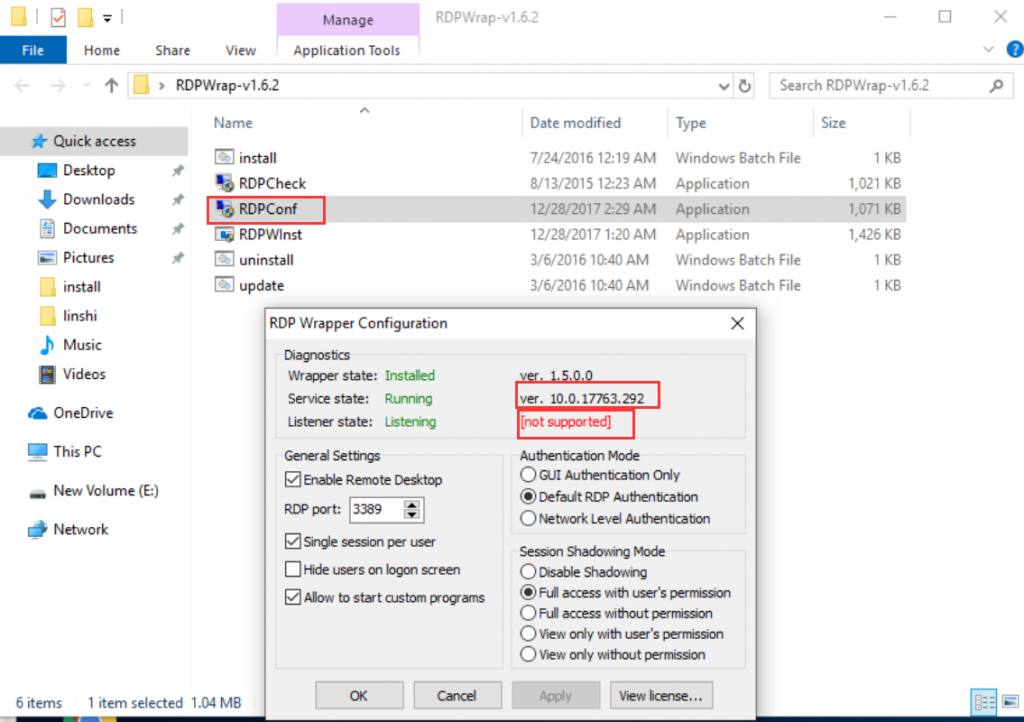
Cause:the system patch modified the terminal services (termsrv.dll) file, causing the RDP Wrapper failed.
Prior Solution: by updating RDP Wrapper
Run “update.bat” directly in the RDP Wrapper folder and wait for seconds for processing update; then run the “RDPConf.exe” file to check if it is supported after the update.
If the above update does not work, try the following solutions.
Recommended Solution 1:by replacing the terminal services file (termsrv.dll) with an old version.
- Uninstall RDP wrapper:run the “uninstall.bat” file at the RDP Wrapper’s folder.
- Stop& remote desktop services: open “services” panel, run “services.msc”, find “Remote Desktop Services” , double click to disable it.
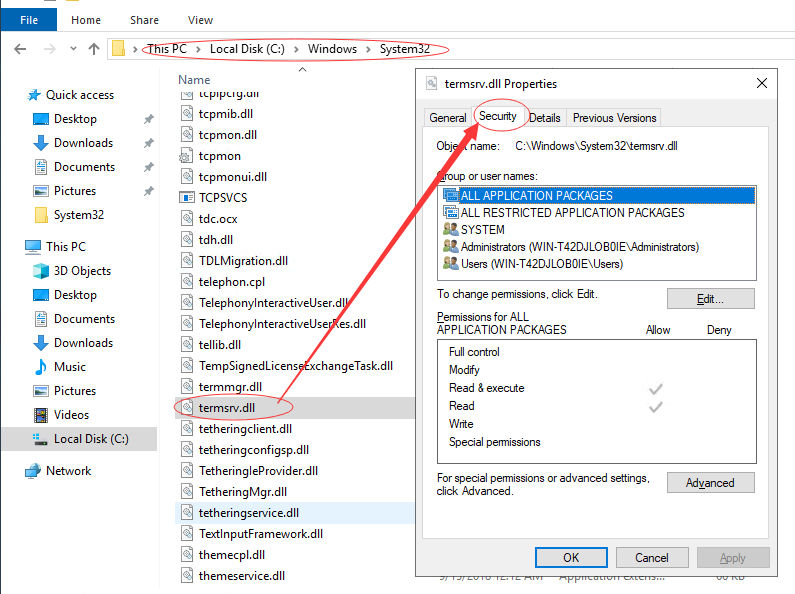
- Replace the “termsrv.dll” file: click here to download and find the correct old version of “termsrv.dll” file according to your system.
Go to C:\Windows\System32-> right-click to choose” Property”->Security
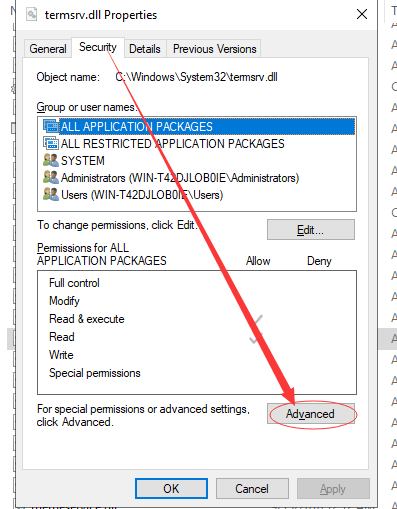
->click “Advanced”
->click “Change” to change the owner
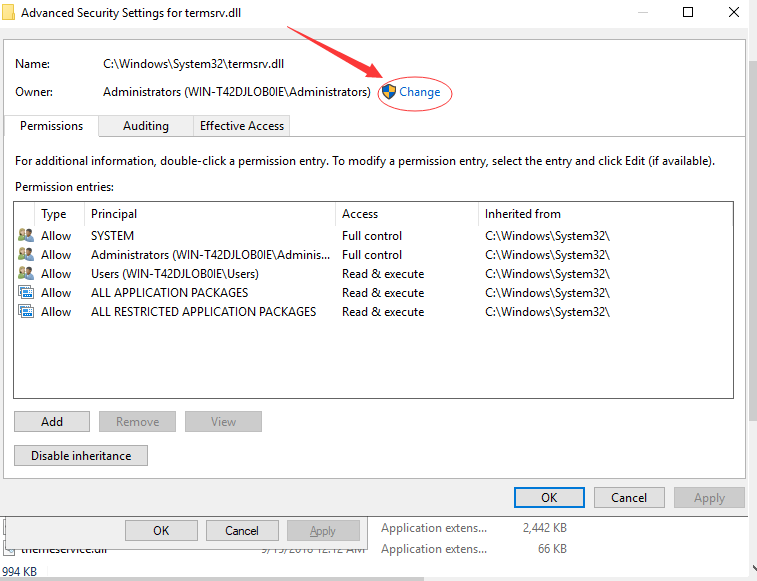
-> click “Advanced”
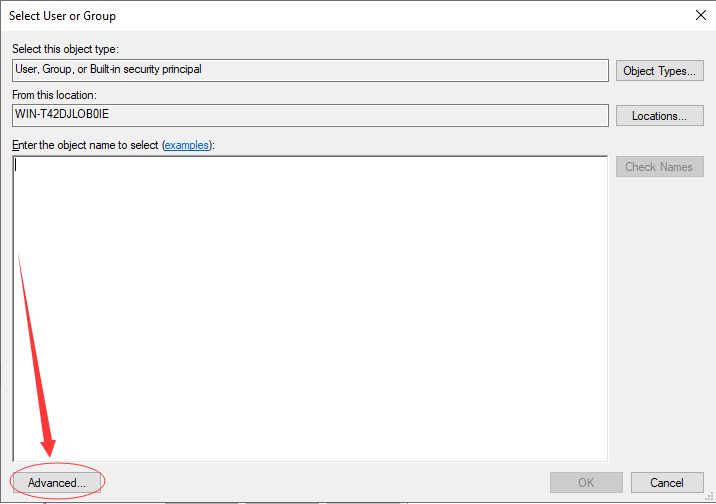
-> click “Find Now”
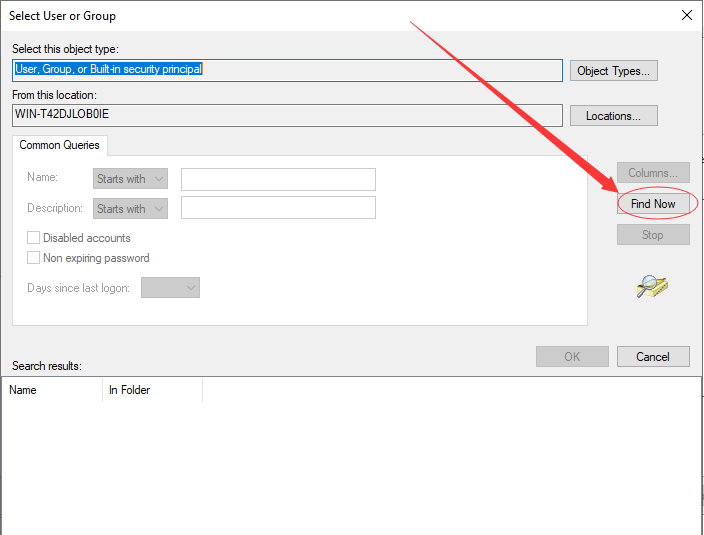
-> choose “Administrators” group
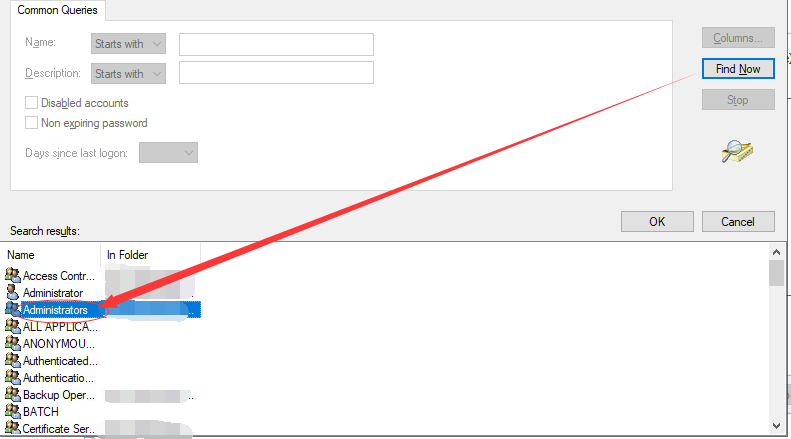
-> apply changes -> go back to the “Security” tab, click “Edit…”
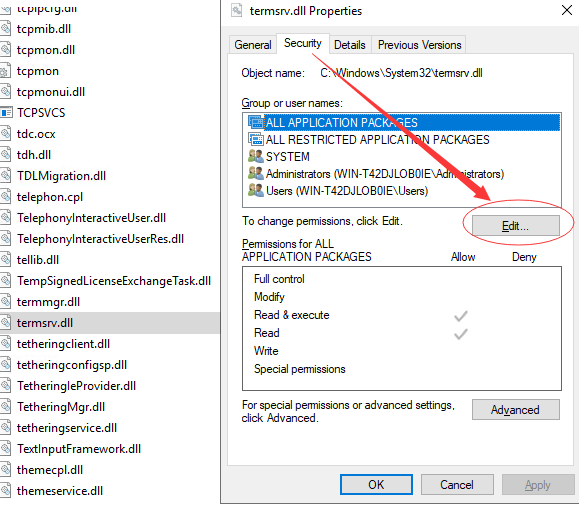
-> select to allow “modify”
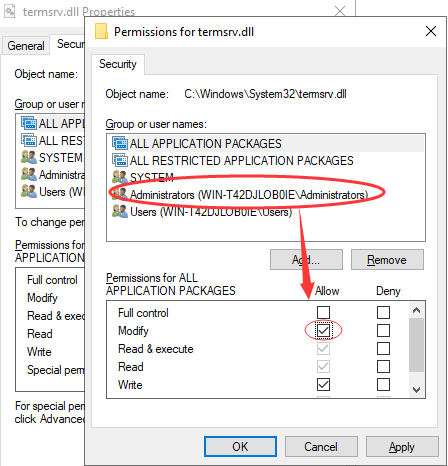
-> apply changes -> right-click “termsrv.dll” file, and rename it,e.g.: “termsrv.dll.bak”
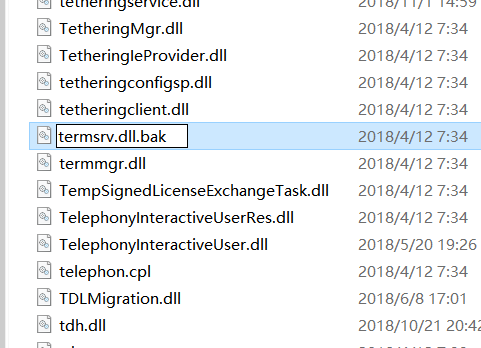
-> click “yes” in the pop-up window to confirm rename -> copy the downloaded old version of “termsrv.dll” into this folder to complete replacement.
- Enable remote desktop services.
- Re-install RDP Wrapper.
Solution 2:by uninstall the recent system patch.
Uninstall the patch through: start-> settings-> update & security-> view update history-> uninstall patches, click on the patch to uninstall; or run CMD command to uninstall: wusa /uninstall /kb:patch code/quiet .
Note: if you have deleted the patch backup in the system folder, you will find the uninstall option of this patch unavailable.
How to disable the automatic system update?
Download and install Windows Update blocker at https://www.sordum.org/.
Windows Update Blocker is developed by BlueLife and published on sordum.org. Windows Update Blocker is a freeware that helps you to completely disable or enable Automatic Updates of your Windows system, with just a click of the button.
Windows Update blocker helps you automatically disable or enable the system services in association with Windows update, including Delivery Optimization Service(dosvc), Windows Update Medic Service(WaaSMedicSvc), Update Orchestrator Service(UsoSv), Background Intelligent Transfer Service(BITS). Or you can manually manage these services at the Services panel (run “services”).
Note: RDP Wrapper is developed by Stas‘M Corp and released on Github. Your use of RDP Wrapper is not legally licensed by Microsoft. We recommend you use RDP Wrapper for testing or trial purpose only. For actual use of vCloudPoint products, you are always recommended to purchase and install Microsoft RDS-CALs which is compatible with any future Windows system updates.
(Last update: 03-Dec-2021)
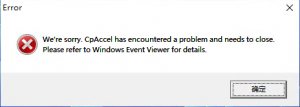
vMatrix is not compatible with HVCI (Hypervisor-protected Code Integrity), enabling this function will cause terminal users unable to connect to CpAccel.
Please disable HVCI by the following steps: (there are 3 methods, you can choose any one of them)
- Using Windows Security app
HVCI is labeled Memory integrity in the Windows Security app and it can be accessed via Settings > Update & Security > Windows Security > Device security > Core isolation details > Memory integrity. Disable it and restart the host as prompt.

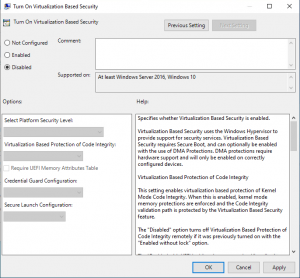
- Using Group Policy Editor
Press “Win“+”R” keys to run “gpedit.msc“. Navigate to Computer Configuration > Administrative Templates > System > Device Guard. Double-click Turn on Virtualization Based Security. Select “disable“, click “OK” and restart the host.
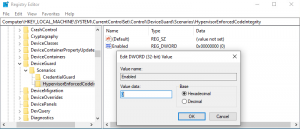
- Using Registry Editor
Press “Win“+”R” to run “regedit“. Navigate to this registry key, modify the value of Enabled to 0 and restart the host.
| Registry key | Value |
| HKLM\System\CurrentControlSet\Control\DeviceGuard\Scenarios\HypervisorEnforcedCodeIntegrity | Enabled=0 |
Notice: Current version of Windows 11 (21H2, OS build 22000.348) will enable HVCI by default when Hyper-v or virtual machine platform enabled. And HVCI cannot be disable by above 3 methods. So please do not enable Hyper-v or virtual machine platform.
(Last update: 15-Sept-2022)
During the installation of vMatrix on Windows 7 and Server 2008R2 systems, the prompt “Windows requires a digitally signed driver” may appear
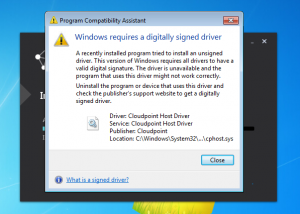
This is because vMatrix uses SHA-256 verification, and Windows 7 and Server 2008R2 systems do not support SHA-256 verification
Solution:
Upgrade to SP1 and install KB4474419/4490628 patches
When the patch installation is complete, restart the system as prompted. If the problem is still there, please uninstall vMatrix and then reinstall it.
Extensional Management Tips
(last update: Jan-09-2017)
When a single host computer is shared by multiple users running vCloudPoint zero clients, how to make the most use of the host resources and support more users is the administrator’s top concern. Which media player you choose and how you use it for playing local videos have a great impact on the CPU consumption of the host. GOM Player, KM Player, Potplayer, SMPlayer, and Media Player Classic are some of the popular media players that customers are most likely to use. These media players have the most codecs included for supporting a large number of media formats. However, as some of these media players do not support hardware acceleration, you may experience heavy CPU consumption when playing local videos with them.
Strongly Recommended:
VLC player supporting client-rendering with hardware acceleration
To help customers offload host-side CPU consumption on video playing and support more video users per host especially for cases where simultaneous video play is often required, beginning from vMatrix 2.0 version, we introduced a new feature of client-rendering support. This feature allows local videos played on the zero client with VLC player to be rendered locally by the client processor instead of the host CPU, therefore, host CPU consumption is only taken by the running the VLC player itself to as low as less than 1% of an i7 processor per video. This feature is supported by VLC player of 2.1.5 or newer versions and works automatically after the installation of vMatrix 2.x. You just make sure you are using the correct versions of vMatrix and VLC player and VLC player is selected to play the video, then you are ready to go.
Note: As the media content is not rendered at the host side, there is a drawback of using this feature: media content within the VLC player cannot be viewed by the administrator through monitoring at the host side.
Alternative:
Use K-lite codec pack with Media Player Classic supporting host-rendering with hardware acceleration
When using MPC (media player classic) for playing videos on the zero clients, although the rendering job is still done by the host CPU and the consumption is higher than using VLC player, as MPC supports hardware decoding, the host CPU consumption is greatly reduced to as low as 1/2 of using other players without hardware acceleration.
Below is the download link and configuration steps:
1. download K-lite standard codec pack at http://www.codecguide.com. The Media Player Classic is bundled.
2. install the K-lite pack on the host. The Media Player Classic is integrated so you don’t have to install it separately.
3. Open “Codec Tweak Tool” at “Start” menu–>”K-Lite Codec Pack” or “Tools” at the installation file.
4. Click on “DirectShow (x86)” if you are Windows system is 32 bits, or “DirectShow (x64) if 64 bits.

5. On the next popup window, select “Video: LAV Video Decoder”, and apply.

After it is applied, “LAV Video Decoder” goes to “DISABLED FILTERS” as below:

6. Open the Media Player Classic, go to “View”-”Options”-”Playback”-”Output”, select the “DirectShow Video” option. And all configurations complete.

(last update: Mar-29-2016)
On Windows 8 or later systems, remote desktop users are not able to shut down the host. But for Windows 7 and earlier systems, the shutdown option is available to remote desktop users. Below is the guide to preventing zero clients users from shutting down the host.
1) on the host, open the security setting console through Control Panel –> Management Tools — >Local Security Settings –> Security Setting –> Local –> User’s right assignment –> Shutdown Operation system
2) delete users or groups that are not allow to shutdown host. 
(last update: May-3nd-2018)
Disable Password Complexity Requirement on Windows Server Systems through Group Policy
Description:
By default, Microsoft Windows Server System enforces users to use strong passwords for safety. But you can disable password complexity through group policy to avoid the trouble of using a complex password for zero client users.
Environment for this guide:
Windows Server 2012 R2
1, Click “Start” menu on the lower right corner of your desktop, and then go to “Run”, Input “secpol.msc” (without quotations). Then it appears the box of the Local Security Policy settings under the Group Policy.

2, Hit “Account Policy” on the right panel.

3, Hit “Password Policy”.

4, Find in the box “Password must meet complexity requirements”, and then double click it to change the setting.

5, In the pop-up window, select “Disable” and click “OK” to apply.

6, Now you can set new simple passwords. If needed, you can also disable password age, length and history in the same box.
Download This Guide(last updated: Oct-28th-2019)
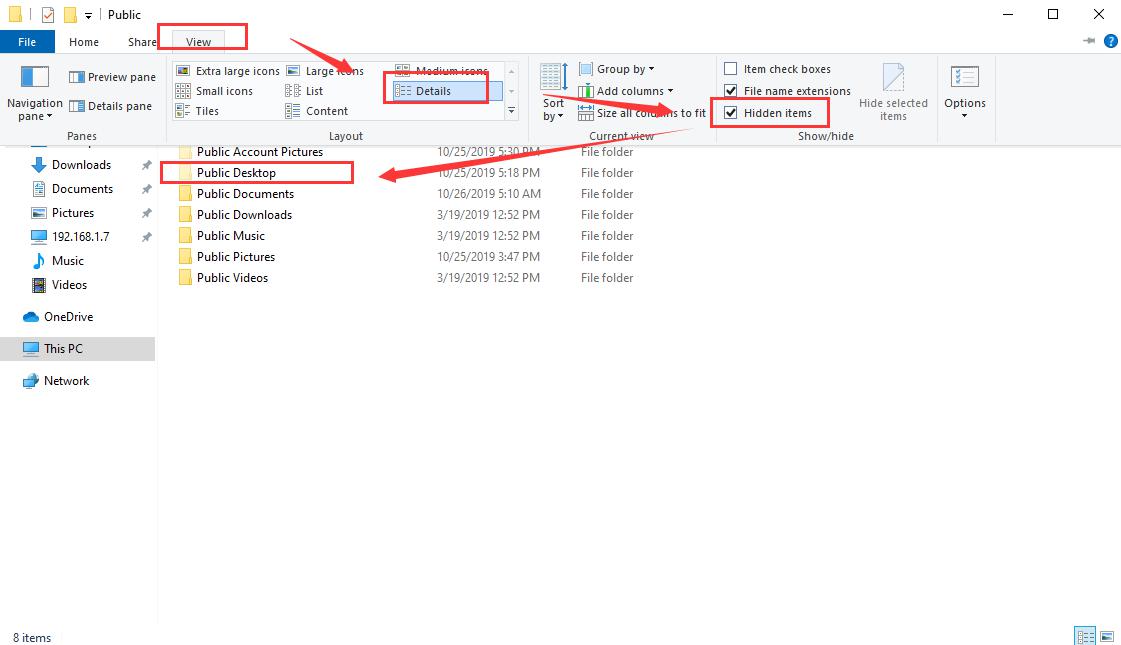
Some application software will not automatically create shortcut icons on the desktop of all end-users after installation. You can manage the shortcuts on the end user’s desktop centrally at the public desktop folder.
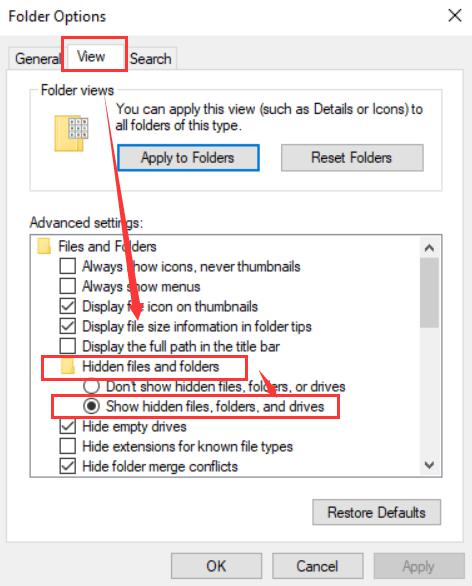
The default path of the public desktop folder is C:\Users\Public\Desktop, you can copy the path to the folder search bar and directly locate it, or open “This Computer” – “C Drive” – “User” – “Public”; public desktop folder is a hidden folder, you can show it by clicking on “View” – “Hidden Items” at the top menu (to show hidden folders in Windows 7/ 2008R2 or earlier systems, click “Folder options”- “View” – “Hidden files and folders” – “Show hidden files, folders, and drives”.
(last updated: Jun-17th-2020)
Description:
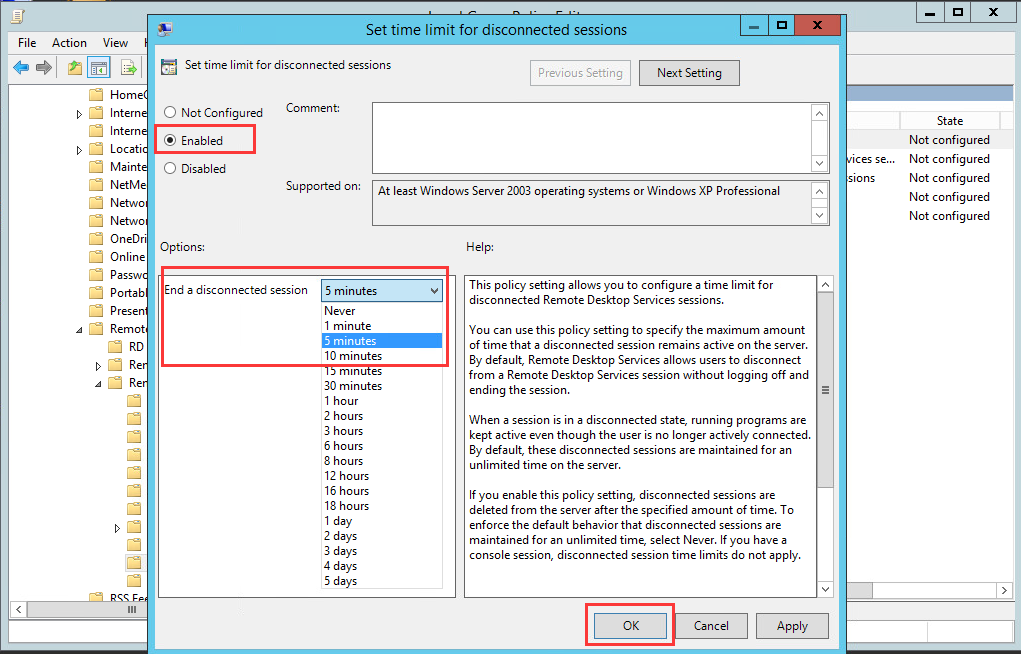
This policy setting allows you to configure a time limit for disconnected Remote Desktop Services sessions.
You can use this policy setting to specify the maximum amount of time that a disconnected session remains active on the server. By default, Remote Desktop Services allows users to disconnect from a Remote Desktop Services session without logging off and ending the session.
When a session is in a disconnected state, running programs are kept active even though the user is no longer actively connected. By default, these disconnected sessions are maintained for an unlimited time on the server.
If you enable this policy setting, disconnected sessions are deleted from the server after the specified amount of time. If you have a console session, disconnected session time limits do not apply.
Configuration Steps:
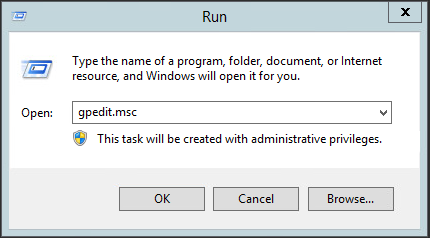
- Log in with an administrator account, press “Window”+ “R” to launch the“Run”
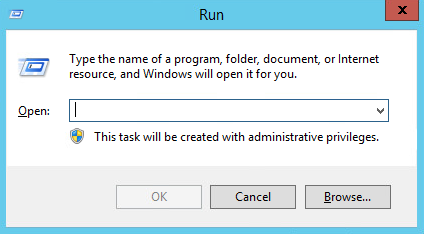
- Enter “gpedit.msc” and press “Enter” to enter the local group policy editor.
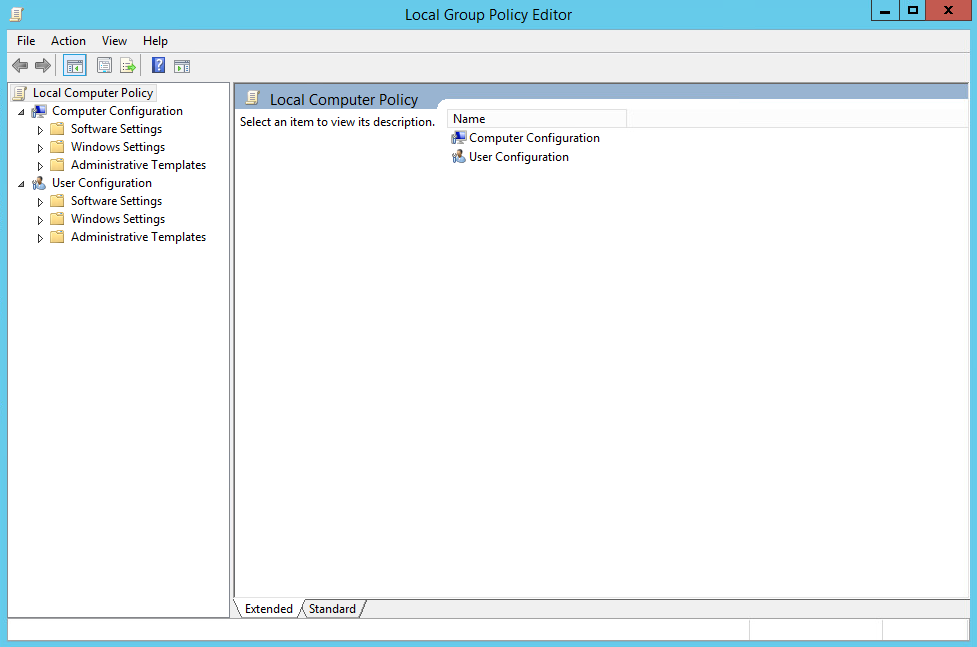
- Find:Computer Configurations->Administrative Templates-> Windows Components-> Remote Desktop Services-> Remote Desktop Connection Host-> Session Limits.

- Select “Set time limit for disconnected sessions”, right-click to select “Edit”.
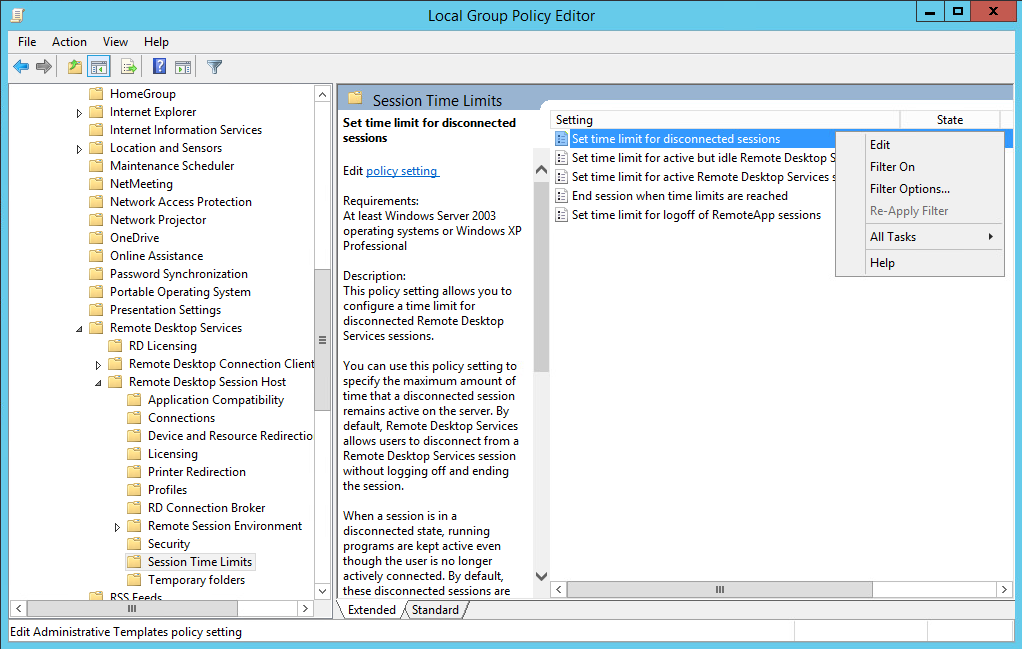
- Select “Enabled”, and select a time at the options for“End a disconnected session”, and then click “OK” to apply the configurations.
(last updated: Jun-24th-2020)
Within a centralized computing solution, data is not stored on the user’s local devices but is stored centrally on the remote host or storage server, which facilitates the protection and control of information security, especially for organizations that are sensitive and demanding in data security. In addition to the execution of certain internet control policies to prevent date leak, organizations also need to limit write access to removable storage devices to prevent employees from copying confidential data to storage devices such as USB flash drives and portable hard drives.
Configuration Steps:
1) Log in with an administrator account, press “Window”+ “R” to launch the“Run” window and enter “gpedit.msc” to open the local group policy editor.
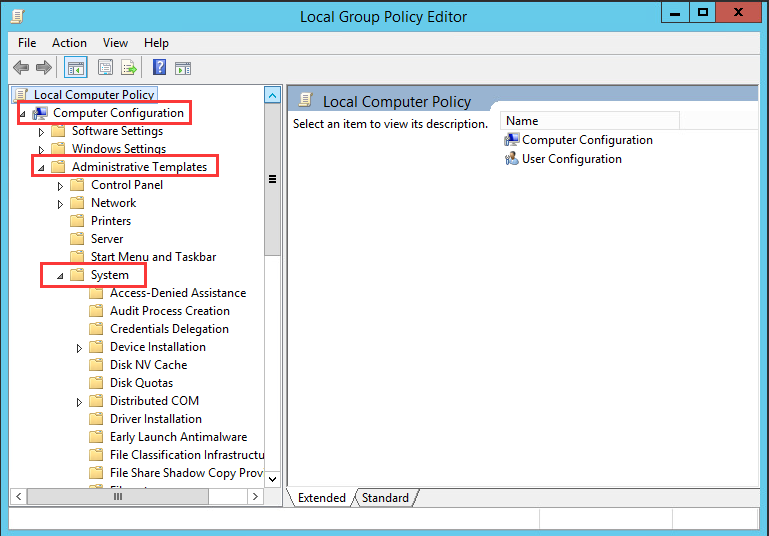
2) Find:Computer Configurations->Administrative Templates->System.
3) Click“Removable Storage Access”, and “Removable Disks: Deny write access” in the right panel.
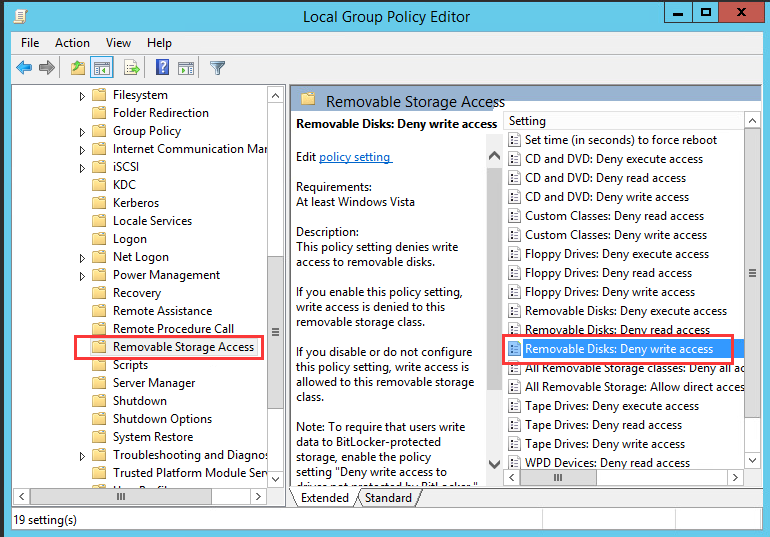
4) In the pop-up window, select “Enabled”, and then click “OK” to apply the setting.
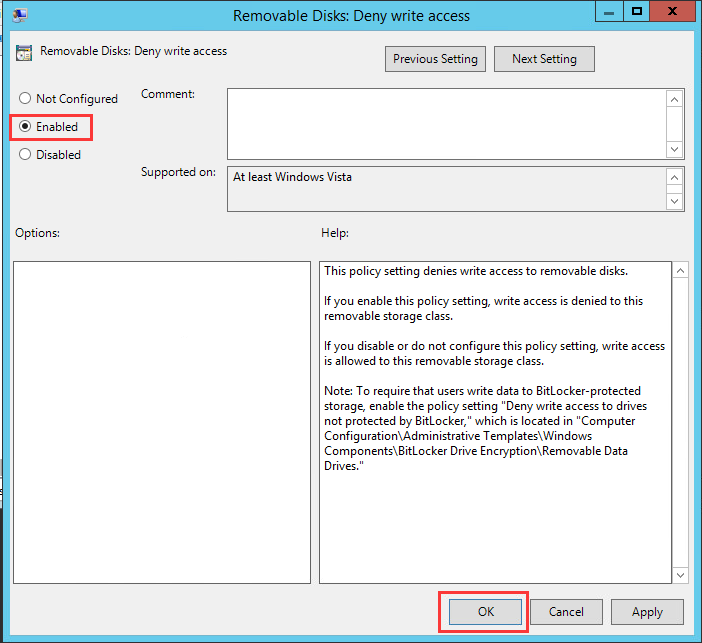
5) After setting, users can read files in removable disks or copy to the host, but cannot write back to the removable disks.
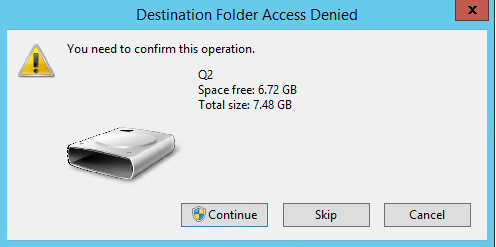
Note: This policy is also applicable to administrators. After setting, administrators will also be restricted from writing to removable disks.